
I was staring at the SRP app on my phone last Tuesday when I realized my living room AC was essentially running a DDoS attack on my checking account. $391.20. In May. In suburban Phoenix, that is not just a utility bill; it is a hardware failure at the enterprise level. I have spent the last 18 months turning my two-car garage into a graveyard of 'science experiments' trying to fix this, and my latest build—a permanent magnet generator—just finished another month of production testing.
Before we dive into the copper coils and the heat, a quick heads-up: this site uses affiliate links. If you click one and buy something, I earn a commission at no extra cost to you. I only talk about energy gear I have actually bolted to my workbench and tested until something smelled like burning plastic. It is how I keep the lights on—literally. I am not an electrician or an engineer, just a guy with a multimeter, so consult a licensed pro before you try to wire anything into your home's main panel.
Think of the power grid like a legacy corporate network. You are paying for every kilobyte of data, and the ISP (the utility company) keeps jacking up the rates because they own the trunk line. My goal was never to go completely off-grid—that is like trying to run a Tier-3 data center on a hotspot. I just wanted to 'load-balance' my home. If I could generate a consistent 'background trickle' of electrons to handle my always-on hardware, I could shave that peak off the monthly bill.
The Topology of the Build: Copper, Magnets, and Latency
In my first attempt late last year, I used salvaged parts from an old ceiling fan. It was a total disaster. The 'latency'—or in this case, mechanical friction—was so high that it took more energy to spin the rotor than I was getting out of the coils. For this 2026 update, I went for a clean-sheet design based on electromagnetic induction principles. If voltage is bandwidth, I needed a cleaner path for the flux to travel.
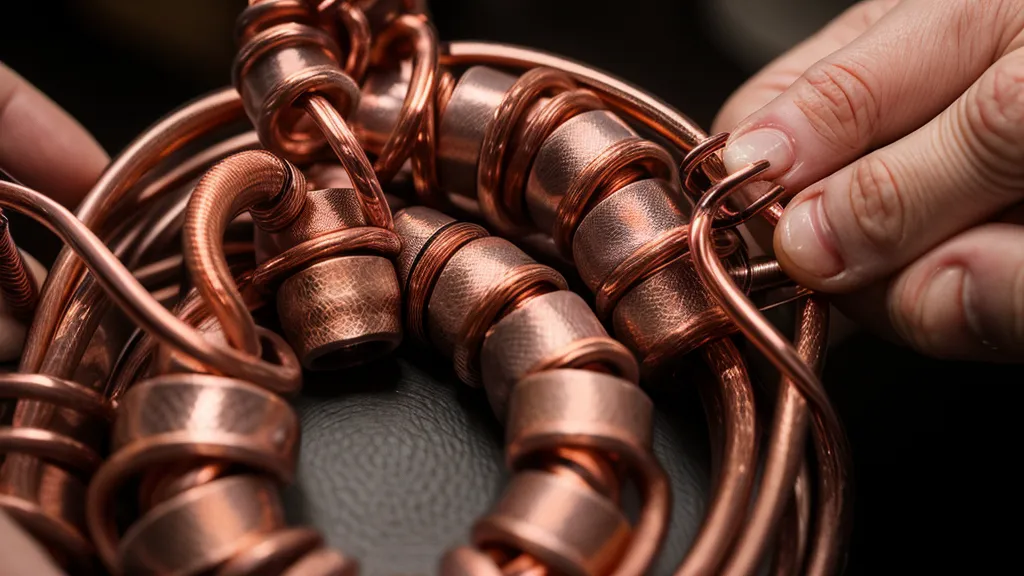
I invested about two hundred dollars in high-grade Neodymium magnets (N52 grade), 18-gauge copper wire, and a custom-cut acrylic housing. My wife calls it the 'Spinning Hum of Doom,' but to me, it looks like a beautiful hardware hack. The hardest part was not the wiring; it was the alignment. If your magnets are off by even a millimeter, the magnetic flux 'drops packets,' and your output flatlines. It is exactly like trying to align a point-to-point wireless bridge across a parking lot—precision is everything.
I realized early on that I am an IT guy, not a physicist. I do not have time to calculate flux density manually. I ended up using the blueprints from the Energy Revolution System. What I liked about it was the 'ReadMe' style of the instructions. It did not feel like a textbook; it felt like a step-by-step guide to assembling a server rack. It saved me from the 'Blue Screen of Death' I experienced with my first three failed rotor designs. I have actually found that How the Energy Revolution System Helps Reduce Home Energy Use is more about this kind of architectural efficiency than just raw power.
The Bill of Materials: What 35 Watts Actually Costs
Let us look at the actual telemetry from my multimeter. After dozens of hours of labor and three 'reboots' where I had to respool the copper coils because I crossed a lead, here are the rough numbers from my mid-May testing window:
- Peak Output: Approximately 15 Volts (unregulated)
- Stable Amperage: Around 2.3 Amps during peak RPM
- Total Wattage: Roughly 35 Watts
- Build Cost: Low-to-mid three figures (including the magnets I dropped and cracked—don't do that)
Now, 35 Watts sounds like nothing. In the tech world, that is not even a high-end PoE switch. But here is the thing: this isn't solar. It doesn't care if it is 2:00 AM or if we are having one of those weird Phoenix dust storms. It runs 24/7. That is roughly 0.84 kWh per day. At our current 2026 rates, that is about five bucks a month in direct savings.
However, it is all about the cumulative effect. I have offloaded my entire networking closet—the router, the NAS, and the security hub—onto a battery bank charged by this generator. That small 'packet' of energy is now handling my entire 'background service' load. I have even looked into how this compares to other setups in my post on Power Grid Generator for Home Office Use: My IT Server Setup.
The 'Thermal Throttling' Problem in the Desert
One thing I haven't seen anyone talk about in the DIY forums is the Phoenix heat factor. By late last month, my garage was already hitting 105 degrees by mid-afternoon. Just like a GPU throttles its clock speed when it gets too hot, my generator’s efficiency started to tank as the copper coils heated up. Resistance increases with temperature—it is basic physics, but it feels like a hardware bug when you are watching your Amps drop just because the sun came up.
I tried adding a small 12V cooling fan, but that just ate into my net power gains. This is why I eventually started looking at the Orgone Motor design for a secondary project. It is more compact and seems to handle the ambient garage temperature a bit better without needing a massive heatsink. If you are working in a tight space like a shed or a crowded garage, the footprint of your generator matters as much as the output. If you decide to go that route, be careful with the assembly; I wrote about Troubleshooting the Orgone Motor: Why My First Three Builds Failed because the alignment on those is even tighter than this magnetic rig.
The ROI: Is It Worth the Troubleshooting?
If you are looking for a 'plug-and-play' solution to kill your electric bill, this is not it. This is 'compile from source' energy. You will make mistakes. You will wire a bridge rectifier backward and see a puff of magic smoke. You will spend a couple hundred bucks to save five dollars a month initially. Also, keep in mind that results vary wildly based on how well you balance your rotor and the quality of your magnets—there are no financial guarantees here, and you can certainly lose money on parts if you aren't careful.
But here is the IT logic: Why do we build our own PCs when we could buy a pre-built? Because we want to understand the architecture. My total investment across various versions of this project is now around five hundred dollars. My monthly savings, now that I have optimized the 'topology' of my home battery bank, is hovering around twenty dollars. That is about a two-year ROI. In the tech world, that is a standard hardware refresh cycle. I am perfectly fine with that.
More importantly, I have stopped being a passive consumer of the grid. When the neighbor’s AC unit kicks on and I see the lights flicker, I know my router and my core network are running on 'garage-grown' electrons. There is a nerdy satisfaction in that which you cannot put a dollar sign on. It is about resilience, not just the cents per kilowatt-hour.
My Recommendations for Your 'Version 1.0'
If you are ready to start your own experiment, do not wing it like I did at first. Start with a proven 'ReadMe' file.
- The Best Documentation: The Energy Revolution System is the most comprehensive blueprint I have used. It actually explains the 'why' behind the coil winding, which is vital when you are troubleshooting a dead circuit.
- The Small-Form Factor Choice: If your garage is already at capacity, the Orgone Motor is a much tighter, more efficient build that does not require a massive workbench.
- The Entry Level Path: If you are on a tight budget, the Power Grid Generator is a solid starting point that doesn't require as much upfront investment in magnets.
Just remember to keep your multimeter handy and your fire extinguisher closer. DIY energy is a marathon, not a sprint—and in Phoenix, that marathon is usually uphill, in 110-degree weather, while carrying a heavy battery bank. Take it slow, double-check your polarity, and don't be afraid to start over if your 'latency' gets too high.